Sphinx themes can provide a great out-of-the-box experience, but sometimes there is a need to extend its functionality in ways that are reusable across projects and more likely to survive upgrades. This article covers a variety of ways to achieve this using the following methods:
- Custom JavaScript and CSS
- Custom theme.conf Variables
- Changing the code highlighting styles
- Using html_context Variables
- Adding Deploy, Edit, and Feedback Buttons
- Using a javascript Based Feedback Form
- Adding a sitemap
- Showing last update with git timestamps
- Adding a custom 404 page
- Process per-page metadata
Tip: To see some of these examples in a live demo, check out continuous-sphinx.
1. Custom JavaScript and CSS
Custom javascript and CSS files can be great for overrides and snippets of functionality. First, create a custom.js and custom.css file in the _static folder, then add the following to your sphinx project’s conf.py:
# add custom files that are stored in _static
html_css_files = ['custom.css']
html_js_files = ['custom.js']
2. Custom theme.conf Options
Sometimes the options available in theme.conf aren’t enough and custom options need to be added, for example:
[options]
analytics_id = UA-XXXXXXXX-X
external_resources =
Due to limitations, some data types may need to be set in conf.py and passed through the custom theme.conf options created above:
# Theme options are theme-specific and customize the look and feel of a theme
# further.  For a list of options available for each theme, see the
# documentation.
html_theme_options = {
    'external_resources': [
        ("Wikipedia", "https://www.wikipedia.org/"),
        ("GitHub", "https://github.com/"),
        ("MDN web docs", "https://developer.mozilla.org/en-US/"),
    ]
}
The theme options be referenced in the theme’s HTML template by pre-pending
theme_ to the variables name, for example:
<select>
{% for resource, url in theme_external_resources %}
    <option  value="{{ url }}">{{ resource }}</option>
{% endfor %}
</select>
3. Changing the code highlighting styles
Most themes should support using the different pygment styles for code highlighting. For example, to use the monokai style you can set the following in conf.py, or theme.conf if it exists:
pygments_style = 'monokai'
4. Using html_context Variables
Passing in custom configuration overrides at runtime can come in handy when
deploying to different environments. To take advantage of custom configuration
overrides at runtime, add html_context flags to the sphinx-build command:
sphinx-build -E -b html \
    -D html_context.display_github=true \
    -D html_context.github_user=sphinx-doc \
    -D html_context.github_repo=sphinx \
    -D html_context.github_version=master/source/ \
    -d ./build/doctrees \
    ./source \
    ./build
Then reference them in the theme’s HTML template:
{% if display_github %}
    <a href="https://{{ github_host|default("github.com") }}/{{ github_user }}/{{ github_repo }}/{{ theme_vcs_pageview_mode|default("blob") }}/{{ github_version }}{{ conf_py_path }}{{ pagename }}{{ suffix }}" class="fa fa-github"> {{ _('Edit on GitHub') }}</a>
{% endif %}
5. Adding Edit, History, Contribution, Feedback, and Deploy Buttons
Placing deploy, edit, history, contribution, and feedback buttons to the page navigation improves the usability of the documentation website while also increasing the speed of the feedback and editing loops.
Edit, History, and Contribution Buttons
Allowing less technical user’s to easily edit the page they are reading, using the editor built into the repository manager, can make it feel a lot more like a traditional CMS system:
{% if display_gitlab %}
    <a href="https://{{ gitlab_host|default("gitlab.com") }}/{{ gitlab_user }}/{{ gitlab_repo }}/{{ theme_vcs_pageview_mode|default("blob") }}/{{ gitlab_version }}{{ conf_py_path }}{{ pagename }}{{ suffix }}" class="btn btn-neutral" title="{{ _('Edit Page') }}" rel="{{ _('Edit Page') }}"><span class="fa fa-pencil"></span></a>
    <a href="https://{{ gitlab_host|default("gitlab.com") }}/{{ gitlab_user }}/{{ gitlab_repo }}/commits/{{ gitlab_version }}{{ conf_py_path }}{{ pagename }}{{ suffix }}" class="btn btn-neutral" title="{{ _('Page History') }}" rel="{{ _('Page History') }}"><span class="fa fa-clock-o"></span></a>
    <a href="https://{{ gitlab_host|default("gitlab.com") }}/{{ gitlab_user }}/{{ gitlab_repo }}/blame/{{ gitlab_version }}{{ conf_py_path }}{{ pagename }}{{ suffix }}" class="btn btn-neutral" title="{{ _('Page Contributors') }}" rel="{{ _('Page Contributors') }}"><span class="fa fa-users"></span></a>
{% endif %}
Feedback Button
If you want an easy way for people to contribute feedback to your documentation, you can often use API calls, such as GitHubs, to open and pre-populate issues:
{% if display_feedback %}
    <a href="https://{{ github_host|default("github.com") }}/{{ github_user }}/{{ github_repo }}/issues/new?title=Feedback%20on%20{% for doc in parents %}{{ doc.title|striptags|e }}%20%E2%80%94%20{% endfor %}{{ title|striptags|e }}&body=**Page:**%20{{ html_baseurl }}{{ pagename }}.html%0A%0A**Feedback:**" class="btn btn-neutral" title="Give Feedback" rel="Give Feedback"><span class="fa fa-bug"></span></a>
{% endif %}
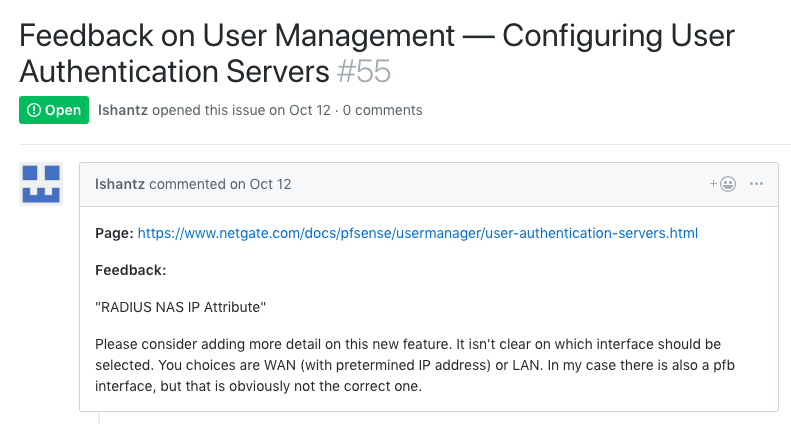 An example of feedback left using the GitHub API to pre-populate an issue.
Deploy Button
Most CI/CD platforms support the use of webhooks to trigger a build. To trigger a build using a webhook you can add the following to the theme’s HTML template:
{% if display_jenkins %}
    <a href="http://{{ jenkins_host }}/job/{{ jenkins_job }}/job/master/" title="Deploy to Production" rel="Deploy to Production" onclick="deploy('{{ jenkins_job }}-deploy')"><span class="fa fa-rocket"></span></a>
{% endif %}
Then, add the following to the custom.js file:
function deploy(site) {
    const confirmed = confirm('Are you sure you want to deploy?');
    if(confirmed) {
        fetch('https://jenkins.example.com/job/' + site + '-deploy/build?token=abcd1234',{ method: 'GET' })
            .then(response => {
                if(response.status === 201) {
                    document.location.href = 'https://jenkins.example.com/job/' + site + '/job/master/';
                } else {
                    console.log('Deploy webhook failed.')
                }
            })
            .catch(error => console.log('error is', error));
    }
}
Note: Make sure to follow the CORS and Mixed Content guidelines for the webhook service.
6. Using a JavaScript Based Feedback Form
For an embedded feedback form versus just a feedback button, you can add the code for that to the theme’s HTML template instead. Here is an example using HubSpot, but you could go with any javascript based form service:
{% if pagename != "search" %}
  <div>
    <p>Documentation Feedback</p>
    <!--[if lte IE 8]>
    <script charset="utf-8" type="text/javascript" src="https://js.hsforms.net/forms/v2-legacy.js"></script>
    <![endif]-->
    <script charset="utf-8" type="text/javascript" src="https://js.hsforms.net/forms/v2.js"></script>
    <script>
      hbspt.forms.create({
        portalId: "XXXXXXX",
        formId: "XXXXXXXX-XXXX-XXXX-XXXX-XXXXXXXXXXXX",
        css: ""
    });
    </script>
  </div>
{% endif %}
Once the form is embedded, add custom styles for the form in the custom.css file.
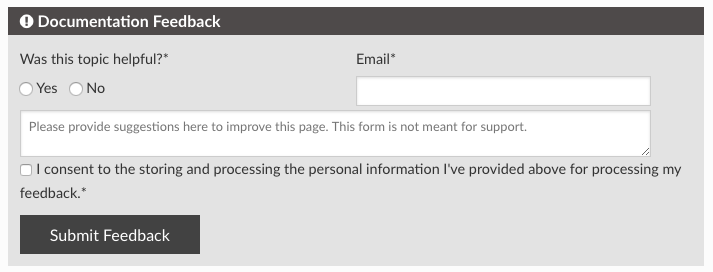 An example of an embedded HubSpot feedback form.
7. Adding a sitemap
Sitemaps can be great for SEO and general website maintenance. The sphinx-sitemap extension silently adds a sitemap with very little configuration.
8. Showing last update with git timestamps
Sphinx has the ability to show the last updated timestamp, but that only shows the last time the page was built, not the last time it was actually changed. The sphinx-gitstamp extension will grab the last change in the page’s commit history and make it available to the HTML template.
9. Adding a custom 404 page
Sphinx does not create a 404 page by default and simply adding a 404.rst file will break all of the static assets due to the use of relative links. The sphinx-notfound-page extension fixes that by allowing you to config default page templates and paths for a 404 page.
Tip: Set up a custom Google Analytics report to track 404 error codes to know when there is an important redirect opportunity that is being missed.
10. Process per-page metadata
Sometimes there is a need to add metadata, or front matter, to specific pages so that custom logic can be built around those values. In order to do that, add document metadata fields to the top of the rst file:
:fieldname: value
Then build the desired logic into the theme’s Jinja templates:
{%- if meta is defined and meta is not none and 'fieldname' in meta %}
    {%- set page_field = meta.get('fieldname') %}
{%- endif %}